Small, but perfectly formed…

Recently repaired one of the smallest analogue (in the main) synthesisers you will come across, the Yamaha CS01.

Yamaha CS01 in all it's simple glory

It can be the source of some very distinctive lead line sounds and is also great fun. This is synthesis at its most basic with only twenty controls (including the Mod and Pitch wheels) and 32 mini keys. There were two versions, the original CS01, released in 1982, which was metalic grey with a light blue labeling and the later CS01-II, released in 1984, that was mainly black with flourescent green lines and an upside down ‘YAMAHA’. I have seen a black version of the Mk1 and rumour has it that there was also an even less common version of the original version in red.

The voice architecture is a single ‘Voltage Controlled Oscillator’, Voltage Controlled Filter and a Voltage Controlled Amplifier with a single Envelope Generator and Low Frequency Oscillator as modulation sources. Having whipped the back off one I have my doubts that the VCO is analogue although the rest of the circuitry looks pretty conventional.

The layout of the front panel from left to right is as follows:-

Controllers: Directly to the left of the keyboard, where you would expect the performance controls, is the Power/Volume control plus the Breath Controller sensitivity controls for VCA and VCF. The Pitch Bend and Modulation wheels are at the back of the panel to the left of the keyboard with a modulation destination switch below them. This switch selects where the LFO output goes, to VCO or the VCF. Sadly the Pitch Bend is only up (sharp).

Behind the 32 note mini key (F-C) top note priority keyboard are the rest of the controls laid out in seperate sections, they are all sliders or switches that look like sliders.

LFO: First up is the ‘LFO Speed’ control. The LFO wave shape is a triangle shape only with a range of 0.5Hz – 10Hz.

VCO: The VCO section has five controls, Glissando, Pitch, Feet, Wave and PWM Speed. Glissando, instead of portamento is another giveaway that the VCO is digital although at the faster speeds the effect is virtually identical to portamento (thankfully). Pitch is a fine tune control with a range of plus or minus a semitone. Feet is a slider control with five stops, 4′, 8′, 16′, 32′ and WN which replaces the current VCO waveshape with white noise (that has no pitch). Wave is also a five way switch that selects Triangle, Sawtooth, Square, Fixed Pulse and Pulse Width Modulated waveshapes. The PWM Speed slider controls the speed of the dedicated PWM LFO (nice idea…).

VCF: Next is the VCF Cutoff Frequency slider that controls the cutoff of the fairly weak, 12dB / octave, VCF. Worse still the Resonance control is a two position switch (on the original) that selects resonance low or high. Thankfully this was replaced on the CS01-II with a proper slider and the VCF was also beefed up. Finally there is an EG Depth slider that behaves as expected.

VCA: has an EG Depth control that is a single slider that controls the effect that the EG has on the VCA .

EG: Finally there is a conventional ADSR envelope with a slider for each segment of the envelope.

On the left hand end is a socket for a Yamaha BC1 breath controller and on the right hand end are sockets for Line Out, Phones and a nine volt half-brick (power supply).

The last two inches of the front panel are taken up by a small speaker that can be used for monitoring the sound. As the CS01 can be powered by six ‘AA’ batteries this makes it completely portable and it can be used anywhere. This portability is one of the keys to the success of the instrument. If you use the line out socket (thus muting the internal speaker) and attach a guitar strap to the thoughtfully positioned strap buttons we are now into the ‘stroll around, pose like crazy, Jan Hammer school of playing and great fun it is too! The weird positioning of the perfomance controls now make sense as you just curl your fingers round the rear of the case to reach them and even the upside down ‘Yamaha’ on the CS01-II now looks right.

So whats all the fuss about? Well once freed from the constraints of the tiny internal speaker the instrument sounds quite powerful through a decent set of speakers. Coupled with the BC1 breath contoller the expression that can be added to lead lines is quite amazing considering the simplicity of the voice architecture. However the down side is that you look a complete (dribbling) prat while using it which is perhaps that is why the breath controller never caught on.

Because some people think these are toys (and not a true synthesiser) means there are bargains to be had. Sometimes found in car boot sales amongst other mini-keyed home keyboards you may pick one up for virtually nothing (I only paid twenty five quid for mine) and for my money that was an absolute steal.

If you see one cheap – buy it…

FM Synthesis – an overview…

The Yamaha DX7 (Mk 1) may be thought by some to be an unusual candidate for these pages as it can hardly be classed as a rare, collectable vintage analogue keyboard (however my point of view is that keyboards are to be played, not collected). But as it was originally produced in 1983 and was the first affordable digital synthesizer then now seems as good a time as any for a re-appraisal of this enigmatic keyboard. I say enigmatic as I am sure that a vast number of current and past owners of DX7’s probably never will understand how they work.

I still find that this is the keyboard for percussive bell sounds, excellent electric pianos and extreme bass sounds. For the rest of the time (with the Special Edition ROM) it makes an excellent master keyboard. However for real in depth FM search out the SY77 or it’s module equivalent, the TG77.

The DX7 was first produced in 1983 (after several years of apparent inactivity from Yamaha on the synth front) it followed the extremely expensive and completely preset GS1 and GS2 and took the synth market by storm. This was for several reasons, firstly it sounded good out of the box with sound that were less ‘electronic’ than other synths, secondly it was touch sensitive (with a decent keyboard to match), thirdly it was affordable (£1500 / $1800 approx). For these reasons it was soon the keyboard to be seen with during the mid-eighties and was so popular it even got a second chance with the DX7 MkII (not many synths get that honour). In total Yamaha went on to make something like 160,000 of them. As Yamaha held the patents on FM (developed by Professor John Chowning at Stamford University, USA) they went on to make about every possible flavour of FM synth from the portable DX100 through to the massive (professionals only) DX1. The range consisted of:-

  • DX1 – Voice structure of two DX7’s but with larger LCD and better user interface, seperate controls for envelopes, weighted 73 note keyboard with poly-aftertouch, high quality wooden case and a list price of 9500. A true professional’s instrument.
  • DX5 – similar in function to a DX1 but in a more conventional case (like a larger version of the DX7). With a 76 keys, this time without the poly-aftertouch, this instrument is still a large keyboard but in my opinion if you had the space for it this is an ideal studio master keyboard and it is easier to understand than the DX7 because of the improved control layout. A bargain especially at the sort of silly prices you sometimes see them go for second-hand.
  • DX7 – The ideal all rounder of the range for both studio and live.
  • DX7-IID – Not a simple upgrade but a complete range of redesigns, only loosely based on the success of the original, that was released in 1987. One version, the DX7-IIFD, included a floppy disc drive for voice parameter storage. The DX7S was also released at the same time for the semi-pro market which was nearer to a straight re-hash of the original DX7 (complete with small LCD, although it was back-lit this time). A module (19″ rack mount this time) called a TX802 was also made available.
  • DX9 – same size and case as a DX7, this original partner to the DX7 was an odd part of the range as it was a four operator synth without velocity. This makes it much easier to understand but also eventually quite limited. Expect to pick one up for next to nothing, although I personally would go for a DX21 or DX11 for a cheap 4 operator FM synth.
  • DX11 – part of the third wave of FM synths, a much more compact keyboard and now multi-timbral. Effectively a keyboard version of the TX81Z module, which strangely came out long before the DX11. Four operator but with additional waveforms other than sine waves, this is the best bet of the cheaper FM synths.
  • DX21 – Part of the second wave of FM synths. At this point Yamaha had seemed to have decided that no-one was going to get the hang of programming these synths so they included 128 sounds in ROM that could be retrieved into the normal program locations. Only four operator the DX21 could, for the first time on an FM synth, produce splits and layers as well as having a chorus. Sadly velocity could only be sent via MIDI, as the keyboard fitted was not capable of sensing velocity itself.
  • DX27 – similar to the DX21 but without the split / layer facility. 192 presets in ROM that could be accessed directly and only needed to be put into user RAM if edited.
  • DX100 – mini-key version of the DX27 and could be used as a strap on MIDI remote keyboard, complete with conveniently placed real time controllers that fell to hand when being played standing up. Great fun – used to have one and regret selling it now.
  • TX816 – Has to be mentioned for the total overkill factor as this was a 19″ rack mount setup with eight TF1 modules in it, each module was equivalent to a DX7. The only time I ever had a chance to use one of these it was being driven by a DX7 so that was equivalent to NINE seperate DX7’s! As each TF1 can remember a tuning offset then calling up a patch on the DX7 controlling the rack would, through sysex, put the same patch in each TF1 but with the tuning offset intact. This results in truly monstrous sounds. Was also available as the TX216 with just two TF1 modules.
  • V50 – odd one out as although not a synth with ‘DX’ in it’s model number this was the last of the pure FM synths and the only one that was a workstation. In effect this was two DX11’s plus a drum machine, sequencer, disc recorder and effects.

Although Yamaha no longer produce a pure FM synth elements of FM turn up in some of their newer products. The range is diverse with some lower end products such as the SY35, TG33 as well as some of the high end products such as the SY77, SY99 and TG77.

It should be noted that the SY77 and TG77 (the one I still use) was one of the few FM synths that also had a filter, allowing you to filter the results of the FM synthesis section (these two synths also have sample based AWM sources as well).

The principle of operation of all DX keyboards, including the DX7, is called FM (which stand for Frequency Modulation) and the principles on which is based are remarkably simple. A practical example will help. Take ANY analogue synthesiser and patch a single VCO to the VCF, select a waveform that is low in harmonic content (on most synths this will be a triangle) and set the VCF so that it has no effect (ie Frequency = max, Resonance = min, all modulation = zero). Set the VCA / Envelope controls to give an organ style envelope. This is probably the most ‘bland’ sound you have ever programmed but this is equivalent to a DX7 carrier (the carrier is the sound that you can hear). If you now patch the LFO into the VCO at a speed of about 7Hz a pleasant vibrato should result (the LFO is equivalent to a DX7 modulator). This is FM at sub audio and is perceived by the ear / brain system as vibrato (no surprises yet). As the rate of the LFO is increased then the the change in the sound becomes perceived as a change of timbre instead of a change of pitch (this will depend on the frequecy range of your LFO). If you can patch another VCO (also sine / triangle) into the modulation input of the first VCO (often labelled ‘Cross-Mod’, ‘Poly-Mod’ or ‘X-Mod’) instead of the LFO then you will find this is a source of some fairly alarming bell like noises whose timbre depends on the relative volumes and frequencies of the two VCO’s. A similar effect can be extracted from a self-oscillating VCF (a sine wave) being modulated by a VCO (sine or triangle). If you actually get round to trying this you will find that the resulting two oscillator system is fairly unstable and unpredictable (but good fun).

DX7 Operators - Modulator / Carrier pair

Diagram showing a pair of DX7 operators in a Modulator / Carrier configuration

But what has this to do with the DX7? Well as mentioned earlier the basic building block of any FM synth is the ‘operator’ which is a sine oscillator / envelope combination whose frequency can be controlled by the keyboard or by other operators. An important thing to note is that the operator is generated digitally so it’s behaviour is very predictable. This is important when these operators are made to interact with each other (remember the instability of the VCO’s in the above experiment). The way these operators (there are six on a DX7) are connected to each other are known as ‘algorithms’ and Yamaha saw fit to provide thirty two (although there are many more possible combinations thirty two seem to be enough to be getting on with).

Algorithm Example

Algorithm Example – see text for explanation

So how do you put all this together? Well lets take an example, something like an electric piano (which the DX7 is quite good at!). First you select your algorithm. This is decided by the type of sound you wish to produce, in our example we wish to produce the ‘thud’ of the hammer followed by a fairly pure, but warm, tone that reacts to keyboard velocity. To do this you choose an algorithm that has the constituent parts you need. I would suggest number 5 (see diagram above) as it has three pairs of operators all in a simple carrier / modulator set up. This allows us to have a sound with three constituent parts, the ‘thud’ is produced by operator pair 5 plus 6 with operator pairs 1 plus 2 and 3 plus 4 producing the warm chorused fundamental. Operator 5 and 6 are used for the thud as operator 6 has the feedback loop around it that allows unstable waveforms such as noise to be produced. As the thud is unpitched then the operators are set with a fixed frequency relationship and are not controlled by the keyboard. the envelope of operator 5 (the carrier) is adjusted to give a small click for the attack of each note. The envelope, level and feedback of operator 6 (the modulator) are adjusted to give the correct tonal quality to the thud. Once happy with the ‘thud’ the two operators responsible can be muted temporarily and the body of the sound can then be worked on. This is created by having a carrier envelope that is longer in duration than the modulator envelope which results in a sound that emulates the harmonic content of a struck tine. Using the copy function it is very simple to create two pairs of operators with the same parameters and then use the fine tune parameter to get the two ‘virtual tines’ to beat and sound less clinical. By using velocity sensitivity on the modulator levels then the timbre of the instrument can be made velocity dependent (just like a real electric piano). This is the secret of the success of the DX7 that also makes it a very difficult keyboard to sample correctly (it is also the reason why I still have an FM synth) as you can create sounds that vary in character in a most unpredictable way dependent on keyboard velocity.

This cannot be a complete description of how to program FM (that would take a complete book) but if you have a DX here are a few different things to try:-

1. For fatter “analogue” pads use a fixed frequency sub-audio carrier.

2. For “vocal” formants use a fixed (audio) frequency modulator, somewhere in the middle of a stack of operators.

3. Subtle use of the pitch envelope can be used to enhance the attack phase of a note (good for wind instrument emulations).

4. White noise and decent analogue sawtooth sound can be obtained from use of operator feedback.

5. Envelope bias can give the effect of an opening filter if applied to modulator sustain levels.

Best Synth ever?

OK, taking a risk here but here is my candidate for the best synth ever, you may disagree…

Mini Moog.

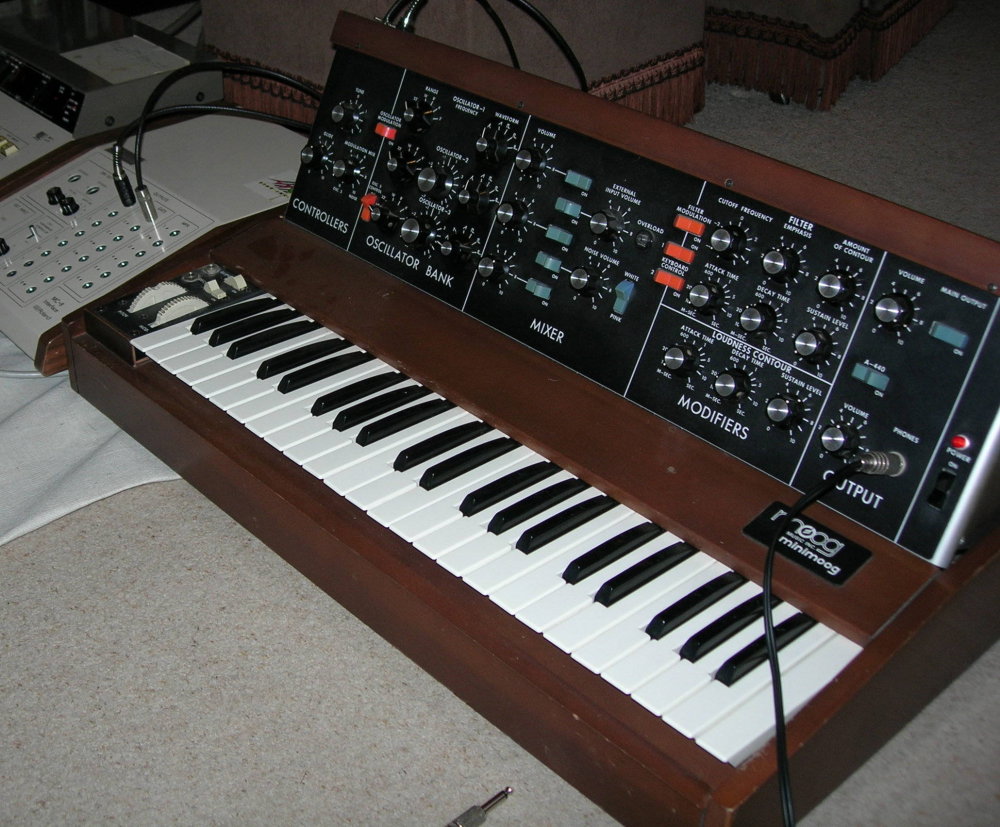
My MiniMoog being used to test a Roland MC8 I had just repaired

There, I’ve said it, but perhaps I should add some justification for such a bold statement.

The Mini Moog has become a synthesiser icon and as such has become steeped in folklore and legend, people boast of it’s prowess and it has become the synth to be seen with. This is unfortunate because in the wrong hands it is not an all rounder and can cause disappoinment (I am sure this is the source of quite a few secondhand or unused Mini Moogs).

To fully understand the Mini Moog you must ask yourself the question, why did Bob Moog and his team design it? If you consider what synthesisers were like in about 1968-69 they certainly were not designed for live performance. So I think his intention was to produce a synthesiser OPTIMISED for live performance. If you view a Mini Moog from this perspective and compare it with something contemporary such as the ARP2600 I think he succeeded. If I had to choose between the two then I would plump for the Mini Moog as I consider it to be a true musical instrument and not some sort of ‘sound lab’ (I had an ARP2600 for many years but when I had to make the difficult choice it was the ARP that was reluctantly sold).

The way the main panel hinges up, the space around controls, the clear layout and the large white lettering all assist rapid patching in the four bars leading up to your searing lead synth solo on a dimly lit stage. For such solos the Mini Moog has all the performance controls needed (the first synth to have mod and pitch wheels).

The main features in more detail…

CONTROLLERS: To the left of the 44 note F-C keyboard are pitchbend and modulation wheels plus on / off switches for glide (portamento) and decay. On the hinged front panel are Tune (used quite often!) the Glide control and Modulation mix. The modulation mix allows any combination of VCO 3 and the noise to be used as the modulation source.

OSCILLATOR BANK: Three VCO’s; VCO’s 1 and 2 having triangle, triangular sawtooth, sawtooth, square, wide rectangular and narrow rectangular waveshapes. VCO 3 replaces the triangular sawtooth with a reverse sawtooth that is more useful as a modulation source. VCO’s 2 and 3 have additional tune controls (plus or minus a fifth) and all three oscillators have a six way pitch switch (32′ – 2′ plus ‘LO’). VCO 3 can be disconnected from the keyboard CV while it is being used as a normal LFO. Oscillator tuning is quite an issue on these instruments and varies between examples because of component tolerances. Later examples have a different oscillator board that is much more stable once it has warmed up (critical parts of the circuitry are heated). Earlier examples (before 10175) have a mainly transistor based design whose stability can questionable (although I know one early example whose tuning is perfect). If you are thinking of buying one check the stability of over a period of about twenty minutes and see if it settles down by comparing it with the (handy) built in 440Hz tuning reference.

MIXER: Five input mixer with a level control and mute switch for each input. Inputs are form the oscillator bank, an external audio input and a white / pink noise source. The audio input also features the brightest overload indicator you will probably ever see!

MODIFIERS :The output of the mixer is hardwired into a 24dB / octave (classic transistor ladder design) with cutoff frequency and emphasis (resonance) controls. There is also a depth control for the dedicated ‘filter contour’ (envelope generator). Keyboard tracking is handled by two switches giving off, 1/3V / octave, 2/3V / octave and 1V /octave, The output of the VCF goes directly to the VCA that has its own dedicated ‘loudness contour’. The envelope generators are both a slightly unusual attack, decay, release design where the decay control determines both the initial decay and release rate. The previously mentioned decay on / off switch forces the release to zero when off. A strange idea but not as bad as it sounds once you get used to it!

OUTPUT: Has a main output control plus mute, a headphone socket and level control and a switch that adds a calibrated 440Hz tone to the output to assist tuning the instrument (also used quite often!). Finally there is a mains switch and indicator.On the top edge of the hinged rear panel are all the input and output sockets. Curiously missing is a keyboard CV output (although this can be added by the technically adventurous).

The MiniMoog is also capable of many more subtle and various sounds. This is because the clever way VCO3 can be used as a modulation source giving you a multi waveform VCLFO that can also modulate at audio frequencies (FM fifteen years before Yamaha!). External audio sources can be modified (Tangerine Dream often fed a Mellotron through a swept Moog filter). All VCO’s can be used as sub-audio sources that can be used to great effect on a filter that is near to self oscillation. You can even feed the output back into the external input if subtlety is not your scene for some of the most industrial (and scary) noises you will probably ever hear. If you are nervous about abusing your MiniMoog with the feedback trick you can get some very similar sounds by modulating the filter at audio frequencies with VCO3’s triangle wave (keyboard control must be on).

So there you have it , in my opinion, one of the best designed synthesisers ever manufactured and if I was forced to choose just one synthesiser to own then this would be it.