The Mellotron – how it works
The Mellotron is a sample replay machine but as it was developed in the early 60’s before the invention of solid-state memory, floppy discs or microprocessors then it used lengths of recording tape to store each ‘sample’.

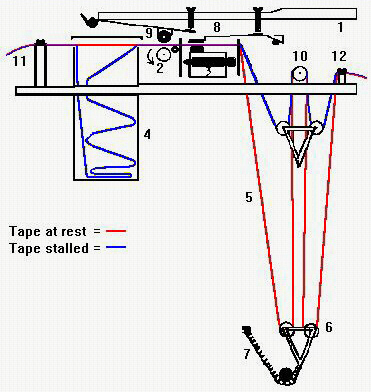
Each note on the keyboard [1] of a Mellotron M400 (although the principle is the same for all models) has a six foot length of 3/8″ wide tape under it that is attached to a clamp bars at the front and rear of the instrument. Starting at the rear clamp bar [11] the tape [5] passes over a tape collection bin [4] that holds the loose loop of tape that is created during tape replay. Next it passes over the capstan [2], then the tape head [3], through the tape guides and then through the sprung roller assembly. The clever bit is the sprung roller assembly that holds the six foot of tape in an arrangement that, from the side, looks like an elongated ‘W’ as the tape goes down to the bottom roller assembly [6], up to the top roller [10], then back down to the second roller on the bottom roller assembly [6] then finally to the front clamp bar [12]. The keys above the tapes each have a rubber pinch wheel [9] above the capston and a felt pad [8] above the replay head assembly [3]. When a key is depressed then the felt pad brings the tape into contact with the head and the rubber pinch wheel presses the tape onto the rotating capstan [2]. This causes the tape to be dragged passed the replay heads at a constant speed (7 1/2 inches per second) thus replaying it’s prerecorded sound. As the tape is pulled through this causes the bottom roller assembly to be pulled upwards (shortening the elongated ‘W’) until the full length of the tape is played causing the tape to stall. When the key is released then the spring [7] on the bottom roller assembly pulls the tape back to the original position and thus quickly ‘rewinds’ the tape ready for the next time the note is required. This means that the attack of the recorded note is reproduced and contributes greatly to the character of the Mellotron’s unique sound.
The following pictures show the innards of my old M400, Mellotron owners are excused the next few paragraphs as they will already know what is inside when you lift the lid.
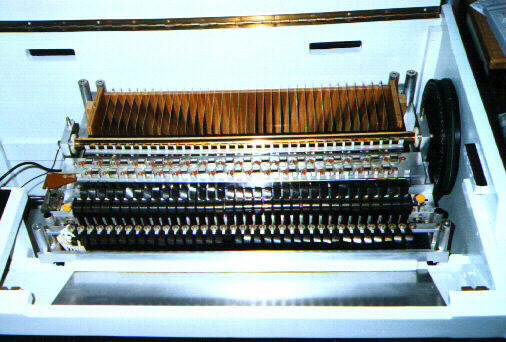
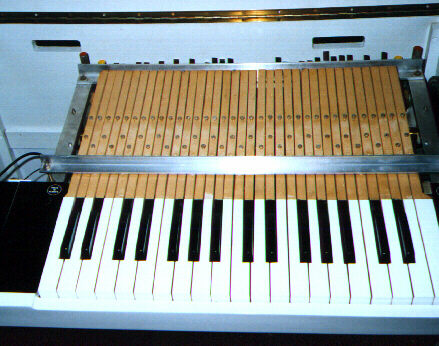
If the keyboard is removed by undoing 4 knurled screws you will reveal the tapes. The tapes can be retracted into the tape frame by undoing the bar at the rear, once this is done the frame can be removed. In this picture the tape frame is installed but the tapes have not been threaded so you can see the rest of the innards.

For those of you who have never seen the insides of a Mellotron the main features are (starting from the rear):-
Tape collection bins, one for each note, collects the tape as the note plays.
Capstan / fly-wheel, in front of the tape collection bins is the brass (or stainless steel) capstan. The fly-wheel is on the right-hand end of the capstan, this helps maintain a constant speed and also takes the drive (from a drive belt) from the motor below.
The rear tape guide comes next, this has to be extremely accurate as mis-alignment can cause tapes to bunch up and cause a horrible mess.
The head-block, in front of the capstan holds the 35 tape heads (one for each note) that reproduce the sound. This block can move left or right and is used to select one of three sounds recorded on each tape.
The tape frame, in front of the head block holds the tapes and the ‘rewind’ spring arrangement that returns the tape to it’s original position when the key is released.
The tape frame is a removable unit that contains the pre-threaded tapes, the return springs and rollers. This allows the musician to be able to change the sounds easily (after a bit of practice). The frames were usually supplied in a flat case, similar to a cymbal case, to protect them as they must be treated with some care.

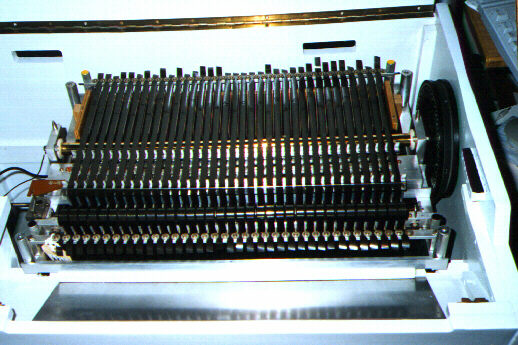
The next picture shows the tapes after they have been threaded. This is an easy job as all the tapes are attached to a bar that is held in place by the 2 yellow finger bolts at the rear of the machine.

Once the tapes have been threaded the plate lying at the front is placed over the exposed part of the tapes above the collection bins and the keyboard is then replaced….

Note that with practice this can be done easily within 2 minutes, we used to change tape frames mid set when my machine used to be regularly gigged.
If you want to find out about routine maintenance then refer to the seperate page on that subject.